Welcome to Emston Tech, One Stop Shop For All Your Solar Needs!
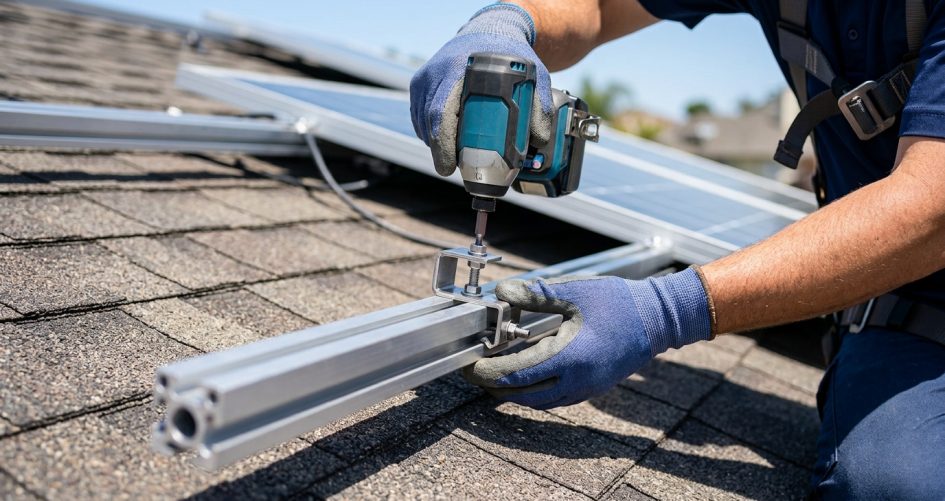
Solar mounting hardware plays a critical role in creating a safe, durable, and efficient solar energy system. While solar panels generate electricity, components like solar rails and mounting clips provide the structural foundation that keeps panels securely attached to rooftops or ground-mounted systems. Understanding how to install solar rail and mounting clips correctly helps installers achieve long-lasting performance while protecting the solar array from weather, wind, and mechanical stress.
At Emston Tech, we provide reliable solar equipment and mounting solutions designed for residential, commercial, and industrial solar projects across the United States. This guide explains the installation process, compares different mounting components, and covers important factors to consider before selecting solar rails and clips for your next project.
Solar rails are aluminum support channels that attach to roof attachments, brackets, or ground-mount structures. Solar panels are secured to these rails using mounting clips, also called clamps. Together, these components create a stable framework that holds photovoltaic modules in place.
The main components of a typical solar rail mounting system include:
Before beginning installation, prepare the correct tools and mounting hardware. Using proper equipment improves installation accuracy and reduces the risk of damage to solar modules or mounting components.
The first step is creating an accurate installation plan. Measure the available roof or ground area and determine the placement of solar panels. Consider panel orientation, shading, spacing requirements, and structural limitations.
A proper layout ensures that solar rails are installed in straight, parallel rows and that mounting clips align correctly with the panel frames.
For rooftop solar systems, attach mounting brackets directly to roof rafters or approved structural points. The attachments must be properly sealed to prevent water intrusion.
For ground-mounted systems, install support posts and brackets according to engineering specifications. The mounting structure should be level and capable of handling local wind and snow loads.
Place the solar rails on top of the installed brackets or supports. Align each rail according to the planned panel layout and secure them using approved bolts and fasteners.
During this step:
Once rails are secured, solar panels can be positioned on the mounting system. Mounting clips hold panels firmly while allowing proper expansion and contraction caused by temperature changes.
The installation process typically includes:
After installation, inspect the entire mounting system before connecting electrical components. Check that all fasteners are secure, rails are properly supported, and panels are firmly attached.
A final inspection should include:
| Component Type | Main Purpose | Common Applications | Advantages |
|---|---|---|---|
| Aluminum Solar Rail | Supports and aligns solar panels | Residential and commercial rooftops | Lightweight, corrosion-resistant, and durable |
| Standard Mid Clamp | Connects adjacent solar panels | Multi-panel solar arrays | Provides secure panel spacing and stability |
| End Clamp | Secures panels at array edges | First and last panels in a row | Improves edge protection and panel retention |
| Rail Connector | Joins multiple rails together | Large solar installations | Allows flexible system expansion |
Correct installation is essential for solar system safety and performance. Avoiding common mistakes can help prevent future maintenance issues.
| Feature | Residential Solar Rail System | Commercial Solar Rail System | Ground Mount Rail System |
|---|---|---|---|
| Typical Use | Homes and small buildings | Businesses and large facilities | Open land solar projects |
| Material | Aluminum alloy | Heavy-duty aluminum alloy | Aluminum or galvanized steel components |
| Installation Complexity | Low to moderate | Moderate to advanced | Advanced |
| Load Considerations | Standard wind and snow loads | Higher structural requirements | Site-specific engineering requirements |
Selecting the right mounting hardware is an important part of designing a reliable solar installation. Consider these factors before purchasing solar rails and clips:
Solar panels have different frame sizes and thicknesses. Choose mounting clips that fit the exact dimensions of your modules to ensure proper holding strength.
Roof-mounted and ground-mounted systems require different mounting solutions. Evaluate roof type, surface conditions, environmental exposure, and structural requirements before choosing components.
High-quality aluminum rails and corrosion-resistant fasteners provide better durability, especially in areas exposed to moisture, salt air, or extreme weather conditions.
Use mounting products designed for solar applications and verify that they meet relevant industry standards. Compatible components simplify installation and improve long-term system reliability.
If you may increase your solar capacity later, select a mounting system that allows additional rails or panels to be added easily.
The installation time depends on system size, roof conditions, and installer experience. Small residential systems may be completed quickly, while larger commercial projects require more planning and labor.
Some experienced DIY installers may install mounting hardware, but solar mounting systems require careful structural planning. Professional installation is recommended for safety, code compliance, and warranty protection.
Most solar rails are made from aluminum because it provides a strong combination of lightweight construction, corrosion resistance, and durability.
No. Mounting clips must match the panel frame thickness and mounting specifications. Always confirm compatibility before installation.
Installing solar rails and mounting clips correctly is essential for creating a secure and long-lasting solar energy system. From choosing compatible components to following proper installation steps, every detail contributes to the safety and efficiency of your solar project.
Whether you are installing a residential rooftop system or a large commercial solar array, Emston Tech offers dependable solar equipment and mounting solutions designed for modern solar applications. Explore our solar mounting products today and build a stronger foundation for your clean energy investment.